In the new Windows 10 operating system, unlike in previous versions, there are two types of login, and this often causes confusion among users. One type, local, is similar to what we are used to with the old operating systems. The second type is an account on the Microsoft website, through which the login is carried out.

Today we will tell how to configure the entrance to the tenth version of the OS from Microsoft
A Microsoft account integrates various services and products of the company into one, allowing you to synchronize data, store information in the cloud, access it not only from different applications, but also from different computers and devices. Includes the following services:
- Outlook - synchronizing mail, calendar, contacts and many other functions between different gadgets, also provides for the use of OneDrive, Office Online and Skype services from the mail interface.
- Office Online - work with Word, PowerPoint, Excel applications in online mode with saving data on the server and subsequent access through your account.
- Skype is a product not so long ago acquired by the company and fully integrated with other applications.
- Access to the Windows store is convenient if you have gadgets with this operating system.
- OneDrive cloud storage.
- Xbox Live is a gaming network that allows you to share achievements, download games, chat and compete with friends.
- Bing is a search service with a system of scoring and receiving prizes.
- MSN - news service interests.
- Stores is an online software and hardware store.
You may not have been convinced by the widely publicized advantages of integration with Internet developer services, you are not using cloud storage and your mobile devices work in other OSs. But every time you start Windows 10, you have to log in by entering a password. Moreover, information about the system is regularly collected and sent to the technical service of the company, which caused a lot of criticism.
For these reasons, the developers have added an option in the last releases at the installation stage of the system, which account to use - the Internet or local. And now it is possible to add or remove an account on Windows 10.
Addition and change
To create a new user in Windows 10, do the following:
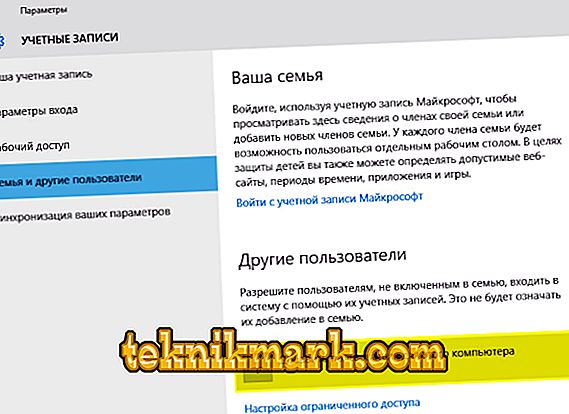
- Go to “Start”, then “Settings” and click the “Family and other users” link.
- If you are already using an online account, you can add additional members of your family, change each level of access, various permissions and restrictions.
- “Other users” is the creation of an independent user not included in the family and not managed by the account. It can use both an online account and a local account.
Select the type of account to create.
- In this section, click on the plus.
- In the new window, you can select the type of creation. If you enter an email, it is assumed further registration on the server. Click “I have no login details ...” to create a local account.
- Further, you can either fill in the registration data on the server, or add a user without an online Windows account.
- Now enter the password and name.

To change admin level:
- Go to “Family and other users”, click on the newly created one and select “Change account type”.
- In the drop-down list, select "Administrator".
To enter Windows 10 under the new account, click on “Exit” under the current icon, and then click on the one you need in the “Start” menu. A local user with administrator rights will be needed later on when you decide to delete a developer account.

You can login under a new account by logging out of the current one.
You can do the same on the command line:
- Open a command prompt as an administrator.
- Type: net user name password / add, substituting your username and password values.
- To change it to admin, type:
net localgroup administrators name / add
There is another option to add a local account in Windows 10:
- In the Run window (WinKey + R) type lusrmgr.msc.
- Click on the “Users” folder and open the context menu in the list window, then click on “New ...”.
- Enter the required parameters.
- After creation right click on it and call properties.
- In the "Group Membership" section, select "Add", enter "Administrators" to change it to an administrator.

You can add an account through the account manager.
Deletion
For those who do not use the services of the developer, there is no need for an account, so you can safely remove it from Windows 10 and use the local one, as in previous versions of the OS. Before deleting, create a new local account.
The first way is to do it through the main menu:
- Click the Start menu, click on the avatar, and click "Change Account Settings."
- In the window that opens, select "Sign in instead with a local account."
- Enter your current Microsoft password.
- Click "Logout and finish work."
- Again click on the avatar and go into the change settings.
- Locate the Microsoft account, click once, and then on the "Delete" button that appears.

Be careful, data will not be returned!
But to avoid such a problem, there is another way to remove a Windows 10 account:
- Go to "Start", "Control Panel".
- Click "Accounts".
- Select "Delete".
- Click on the desired user. Remember that it is impossible to remove the administrator, and the Microsoft account is the default. Therefore, do not forget to create a new local user in advance and change its type to administrator.
- The OS will offer to save the data of the account being deleted on the desktop.
- Confirm your intention to delete the entry.
Logging in to the system under a new account, you will see on your desktop a folder with the saved data of the old.
You can also perform these actions via the command line:
- Through the "Start" open a command prompt as an administrator.
- Insert the net users command.
- A list with names is displayed.
- Enter net user Name / delete, where “Name” is the name of the entry to be deleted.
These are the ways you can get rid of the Windows 10 attachment imposed by the operating system, and use the computer in the old way. But do not forget that all the same integration in the modern world gives a lot of advantages, saves time, allows you to customize software products on different devices to fit your needs. After you manage to delete your account, you can always create a new one and re-register in the company’s service environment.