You must admit that it is practically impossible to work when all the characters on the screen blur and ripple. I am familiar with this problem and that pain in my eyes when I work on a computer with such text for a long time. Unfortunately, no one is immune from this and, I hope, thanks to this article, we can "overcome" the blurred font.

How to fix blurry fonts in Windows 10
The problem of blurred font has not bypassed users "dozens". Usually faced with this when upgrading the operating system.
Before we begin to understand how to fix the blurred font, I would like to add something. Perhaps it's not the operating system and everything is much simpler. Before you begin to perform the operations below, we strongly recommend that you check whether the screen resolution on your computer is correctly set. There is a possibility that the reason for the blurred font was a discrepancy in the resolution of your monitor and operating system. Checked out? Blurry font is not lost? Then let's start.
Usually a blurry font appears as a result of applying an incorrect scale. This problem can be solved in two ways, by changing the scale for a single application or for the system as a whole.
Eliminate blurry fonts in applications in Windows 10
If the font is blurred in your system and not in one or several programs, then this method is for you. Using the steps below, you will get rid of the rippling letters, whether it's Skype or Windows Media Player.
Right-click on the shortcut of the program you are interested in, go to “Properties”, then select the “Compatibility” tab.
Check the box to disable image scaling at high resolution of the screen, click OK.

Removing blurry fonts in Windows 10
If the blurred font in the entire system, then the above method will not work for you. Fortunately, there are several ways to eliminate blurry font in Windows 10 as a whole.
In this way we will reduce the number of dots per inch (dpi), this is not as difficult as it seems.
- The first thing to do is go to the menu "Screen" (System-> Screen).
- Set the "Resize text, applications and other elements" slider so that the numeric value is 100%

- Once you have applied the settings, you should restart the computer.

If you do not like the result of the work done above, there is another option. Its essence lies in the fact that we are returning to Windows 10 methods of scaling from Windows 7 and Windows 8. Sometimes it gives a much better result than with the standard settings.
- First we need to go to the registry. To do this, in the "Start" menu in the search bar, enter regedit and press Enter.

- Go to the next directory HKEY_CURRENT_USER \ Control \ Desktop.
- Find the DpiScalingVer file and set the parameter 0x00001018 (enter 1018 in the field itself), as shown in the figure.
- By analogy, set parameter 1 for the Win8DpiScaling file
- The final step is to create a 32-bit DWORD key, to which we will assign the name LogPixels. Set the parameter to 0x00000078.

Done! It remains only to restart the system and enjoy the absence of a headache after working at a computer with blurred characters.
How to fix blurry fonts in windows 7
All the beloved "seven" can also become a victim of a blurred font. The root of the problem is in the “crooked” smoothing of the ClearType fonts, which is used everywhere in Windows 7, even where it is not really needed. It would be possible to simply disable ClearType, but, unfortunately, this is not always enough.
There are several ways to solve the problem:
Disable ClearType anti-aliasing
The first two methods are very simple to use. In order to disable anti-aliasing, you should do the following steps:
- Click the right mouse button on the desktop.
- Click on the item "Personalization".
- In the lower left corner of the screen, click the left mouse button on the "Screen".
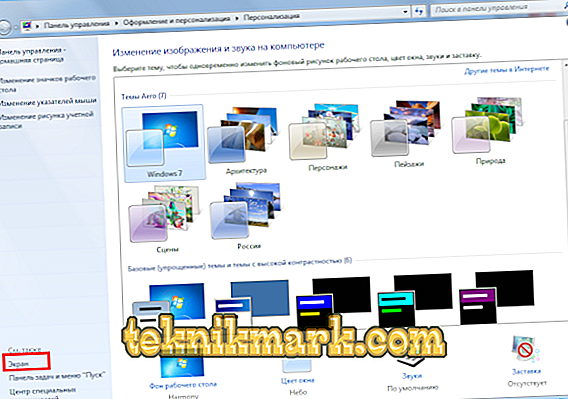
- Then select “ClearType Text Setup”.


This completes the first way to eliminate blurry font.
"Scales in style XP"
The second method is as simple as the previous one.
We perform the same steps as above before step 1.4. and enter the menu "Screen". There we select the item “Other font size (dots per inch)”.
A peculiar ruler will appear, on which we correct the scale by 100% and tick the check box “Use scales in Windows XP style”.

The second method can be considered complete.
Old fonts
The latter method will seem more difficult for an inexperienced user, but we can handle it.
The essence of this method is to use old fonts, for this we have to make changes to the registry, but first things first.
The first thing to do is to create a file with the .reg extension and copy the code below into it.
[HKEY_CURRENT_USER \ ControlPanel \ Desktop \ WindowMetrics] "CaptionFont" = hex: f5, ff, ff, ff, 00, 00, 00, 00, 00, 00, 00, 00, 00, 00, 00, bc, 02, 00, 00, \
00, 00, 00, 01, 00, 00, 00, 00, 54, 00, 61, 00, 68, 00, 6 f, 00, 6 d, 00, 61, 00, 00, 00, 00, 00, 00, 00, \
00, 00, 00, 00, 00, 00, 00, 00, 00, 00, 00, 00, 00, 00, 00, 00, 00, 00, 00, 00, 00, 00, 00 \
00, 00, 00, 00, 00, 00, 00, 00, 00, 00, 00, 00, 00, 00, 00, 00, 00, 00, 00, 00
"IconFont" = hex: f5, ff, ff, ff, 00, 00, 00, 00, 00, 00, 00, 00, 00, 00, 00, 00, 00, 00, 00, 00, 00, 00, \
00, 00, 01, 00, 00, 00, 00, 54, 00, 61, 00, 68, 00, 6 f, 00, 6 d, 00, 61, 00, 00, 00, 00, 00, 00, 00, 00, \
00, 00, 00, 00, 00, 00, 00, 00, 00, 00, 00, 00, 00, 00, 00, 00, 00, 00, 00, 00, 00, 00, 00 \
00, 00, 00, 00, 00, 00, 00, 00, 00, 00, 00, 00, 00, 00, 00, 00, 00, 00, 00
"MenuFont" = hex: f5, ff, ff, ff, 00, 00, 00, 00, 00, 00, 00, 00, 00, 00, 00, 00, 00, 00, 00, 00, 00, 00, \
00, 00, 01, 00, 00, 00, 00, 54, 00, 61, 00, 68, 00, 6 f, 00, 6 d, 00, 61, 00, 00, 00, 00, 00, 00, 00, 00, \
00, 00, 00, 00, 00, 00, 00, 00, 00, 00, 00, 00, 00, 00, 00, 00, 00, 00, 00, 00, 00, 00, 00 \
00, 00, 00, 00, 00, 00, 00, 00, 00, 00, 00, 00, 00, 00, 00, 00, 00, 00, 00
"MessageFont" = hex: f5, ff, ff, ff, 00, 00, 00, 00, 00, 00, 00, 00, 00, 00, 00, 00, 9, 00, 01, 00, 00, \
00, 00, 00, 01, 00, 00, 00, 00, 54, 00, 61, 00, 68, 00, 6 f, 00, 6 d, 00, 61, 00, 00, 00, 00, 00, 00, 00, \
00, 00, 00, 00, 00, 00, 00, 00, 00, 00, 00, 00, 00, 00, 00, 00, 00, 00, 00, 00, 00, 00, 00 \
00, 00, 00, 00, 00, 00, 00, 00, 00, 00, 00, 00, 00, 00, 00, 00, 00, 00, 00, 00
"SmCaptionFont" = hex: f5, ff, ff, ff, 00.00.00.00.00.00.00.00.00.00.00.00, bc, 02.00, \
00, 00, 00, 00, 01, 00, 00, 00, 00, 54, 00, 61, 00, 68, 00, 6 f, 00, 6 d, 00, 61, 00, 00, 00, 00, 00, 00, \
00, 00, 00, 00, 00, 00, 00, 00, 00, 00, 00, 00, 00, 00, 00, 00, 00, 00, 00, 00, 00, 00, 00 \
00, 00, 00, 00, 00, 00, 00, 00, 00, 00, 00, 00, 00, 00, 00, 00, 00, 00, 00, 00, 00
"StatusFont" = hex: f5, ff, ff, ff, 00, 00, 00, 00, 00, 00, 00, 00, 00, 00, 00, 00, 9, 00, 01, 00, 00, \
00, 00, 00, 01, 00, 00, 00, 00, 54, 00, 61, 00, 68, 00, 6 f, 00, 6 d, 00, 61, 00, 00, 00, 00, 00, 00, 00, \
00, 00, 00, 00, 00, 00, 00, 00, 00, 00, 00, 00, 00, 00, 00, 00, 00, 00, 00, 00, 00, 00, 00 \
00, 00, 00, 00, 00, 00, 00, 00, 00, 00, 00, 00, 00, 00, 00, 00, 00, 00, 00, 00
After creating the file should be run, and then restart the computer. There is a small recommendation: before running this file, back up the HKEY_CURRENT_USER \ ControlPanel \ Desktop \ WindowMetrics directory from the registry.
Here, perhaps, that's all. All these methods can be used in a complex or separately.