Many have heard something about virtual machines, something about VirtualBox, something about installing a second OS on a computer. However, few people have an idea about Hyper-V. And in vain, because the program is a good hypervisor, which also allows you to install another one or two additional operating systems and not only. The main thing is to know how to install and configure Windows Hyper-V Server.

What, why and how
First you need to understand the terminology. And not that the beginning user hair stand on end from such an abundance of incomprehensible words.
- Hypervisors create virtual machines.
- Hypervisor is a special software that allows you to divide our PC into one “real” and several or one virtual.
- A virtual machine is this most non-existent computer. It creates its hypervisor. But you can also put an OS on such a computer (depending on the system that creates it: any or some specific ones, for example, only from the Windows family) and then manage it from the application window or something else.
- Hardware virtualization - the creation of virtual reality inside the PC. A hardware virtualization system is often a hypervisor mentioned above ten times. It can also be called "virtual machine manager".
- Guest OS - operating systems located on virtual machines.
What gives us all this?
- The ability to put on the computer two OSes at once. What is pretty cool, if you install not Windows, but something more interesting: the same Ubuntu.
The virtual machine allows you to install two operating systems on one computer
- Ability to test various programs and operating systems. This item is useful to programmers or IT specialists rather than ordinary users. But if you are a beginner representative of one of these professions, then it will be very useful to you to be able to handle hardware virtualization systems.
- The use of programs for our "axis" is not intended. The same games, for example. You certainly won't be able to install the OS from PlayStation 3 (although there is nothing impossible!), But here Windows XP is easy, and it is easy to run a lot of old toys on it.
- Understanding the essence of various processes on the computer. The only way to stop seeing a fig and in the monitor is to constantly practice and perform simple (for specialists) tasks. But books and articles like this, of course, also has not been canceled.

How does all this relate to Hyper-V? The program is this very hypervisor. Along with it, there is also VirtualBox and a number of other applications that perform similar functions. What to use - you decide, and here specifically about Hyper-V.
- This software works only on 64-bit systems. In this case, you can create inside and 32-bit.
- The “parent” of Hyper-V is Microsoft server programs of the same name. "Server" means that they were released for special server operating systems.
- Comes with Windows 8, 8.1 and 10 systems. Unfortunately, there was no Hyper-V on Windows 7 yet.
Work with the program

To install the program you need a modern computer
Hyper-V has system requirements that you should pay attention to before installing it.
- RAM not less than 4 GB.
- Processor equipped with hardware visualization. The technologies are called Intel-VT or AMD-V (may be referred to as VMX or SVM).
- Intel EPT or AMD RVI technology.
To determine whether the last two components in your PC or not, will help the utility Coreinfo. You can download it from the official Microsoft website. Coreinfo is a window with text in which there will be either dashes in front of the parameters you are interested in - there are none - or information about their presence.
Install Hyper-V
If the system requirements are OK, proceed to install Hyper-V. On Windows 10/8 / 8.1, the program is already there, so all you need to do is run it.
- Click Win + R to start the command line.
- Enter: Optional Features
- We find in the components of Windows Hyper-V, set a marker.
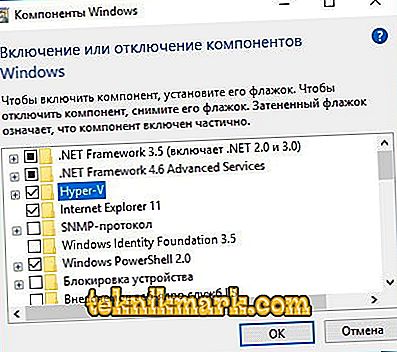
Put a marker near Hyper-V
- Click OK.
- Reboot the PC.

So, there is an installed hypervisor, it remains to make it work as it should and create a virtual machine.
Create a virtual machine
Configuring virtual machines in Hyper-V, as you might guess, is much more complicated than installation. However, even a beginner can handle it.
- Run the program.
- Click the "Create" button in the upper right corner, then - "Virtual Machine".
- A creation wizard appears, read the information, click "Next."
- Come up with a name. Location can not be changed.

Specify the name and location
- Next, we have a choice of two generations. Certain guest OSs can be installed on one and not installed on another. Therefore, when installing the “axis” on your own, check the system width and whether they have UEFI boot media. We choose the second option, as we install a new build of Windows.
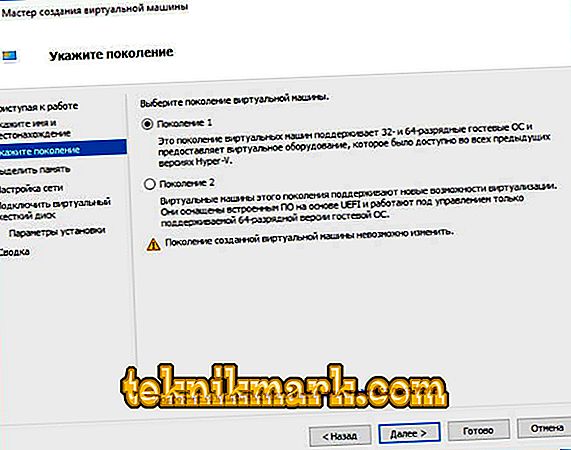
Hyper-V generation selection
- In the next window, you must select the allocated memory. Better to leave 1024 MB. However, if the computer has a RAM above 4 GB, then you can allow more. If you are going to install XP or other light OSes, you can select less.
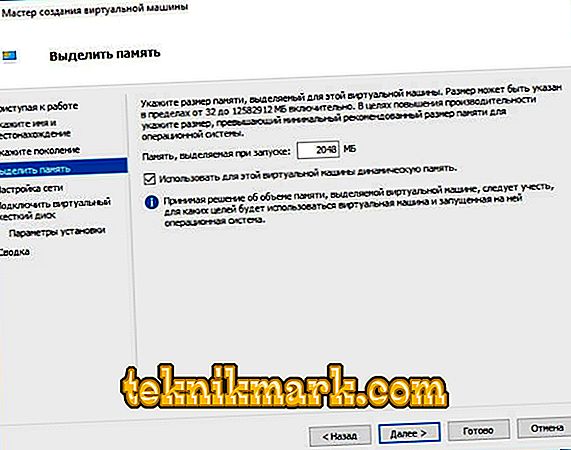
Specify the amount of memory
- Next, we find the virtual switch in the list of network connections, if we created it.
- Create a virtual hard disk, specify its location and size.
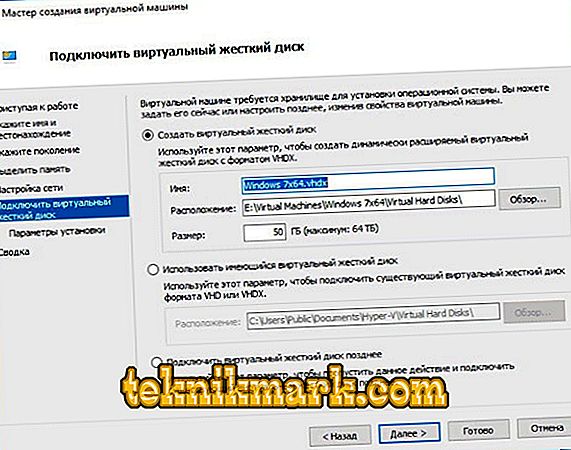
We connect the virtual hard disk
- Finally, specify the path to the system image file.
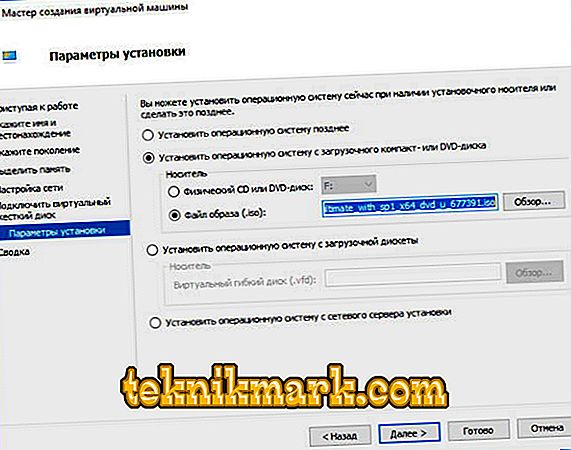
Specify the path to the system image file
- We check all the data and click "Finish".


This setting is not over yet. Now you need to start the car and learn how to use it effectively.
Run, connect to the network and some chips
First consider the launch of the new OS.
- The list in the Hyper-V window displays all virtual machines. We most likely have it alone.
- Select it, click the right mouse button and click "Connect."
- She turns around the whole window. To start, you need to click on the round button at the top. From there, other actions are performed with the virtual system.
- We press any button.
- Now we are working with the OS, the ISO image of which we downloaded.
Everything, the machine is running. When you close the window, we simply collapse it and it continues to work in the background.
In addition to directly connecting the machine, it is important to be able to configure and connect to the network. This is done as follows.
- Open the manager to create virtual switches. It is located in the menu "Actions".
- You can choose three networks: external, internal and private. In short: external - virtual computer – Internet, internal - virtual – physical, private - virtual – virtual. Set up an internet connection.
- Come up with a name. Put a tick "External network" and find in the list of "Family Controller" or another type of connection.
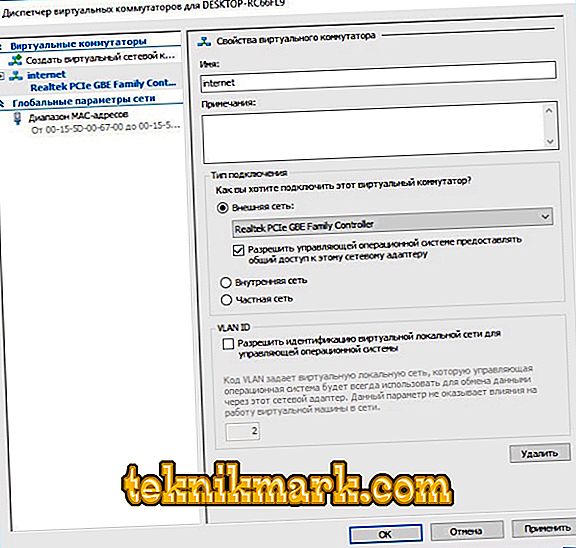
Specify the name of the external network
- We press to apply.

You can create a network connection both before and after creating a “child” OS, nothing will change from this. The machine will still connect to the newly-minted switch.
After installing and configuring Hyper-V, one of the problems that remains when working with systems is the transfer of files from the physical computer to the one we created. To solve it, the best connection to the remote desktop is best.
- Open the command line on the virtual PC (Win + R). We enter: EXE shell32.dll, Control_RunDLL sysdm.cpl,, 5
- We allow connection, it is the lowest marker in the “Remote access” tab.
- Now we enter on the command line: ipconfig
The command is needed in order to find out the IP address. Copy or write it.
- Now go to the physical computer.
- At the command line we drive: mstsc
- Enter the IP, the exact name of the user, we allow you to save credentials. After click "Save" and then "Connect".
Now we can switch between virtual and real computer desktops. What does this give? Transferring files using the standard method: ctrl + C, ctrl + V. Without connecting a remote desktop, this method works only with text.
Where to get the OS?
A question that many probably came up when they read about creating a virtual machine. Operating systems, or rather distributions, can be downloaded from various specialized resources. It is important to ensure that this is an ISO image. Trial versions of Windows can be used for three months. If we talk about Linux distributions, then most of them are free; it’s more important to find the appropriate build and put it into ISO.
Now you have at least a small idea about Hyper-V. Of course, all the functions, complexity and capabilities of the program can not be described in one article. But after reading, you can easily perform a series of basic actions. And then independently install a system that does not belong to the Windows family.