Many users of the Windows operating system, regardless of the version used, are constantly looking for solutions to optimize and speed up their computer. There are a huge number of such solutions, among which the meaning of the most common is to disable “unwanted / unimportant” services, with their work loading and so “overly busy” the processor, RAM and hard disk. Of course, most of these recommendations carry a certain basis and rely on the recommendation of the direct developers of the operating system (how much this word may be relevant in this topic). The service of the “SuperFetch” node, which will be discussed in this article, is recommended to be turned off by most users, because, in their opinion, it loads the disk for no particular reason. But is it really the case and is it true that service is useless? That's about it and will be discussed further.

Steps to eliminate disk loading by the SuperFetch process.
Purpose
So, “SuperFetch” (also known as “super sampling”) is a service whose main purpose is to collect information about all the information transferred between the hard disk and RAM. The meaning of this “compromising evidence” is quite simple and consists in the following aspects:
- Sorting of running software by frequency of calls;
- Based on the information received, the formation of "maps" of links to folders and files is made.
- All the “selected” processes are determined by the operating system favorites and, at the start, are preloaded for their subsequent accelerated launch.
Based on the above, it is possible to draw several logical conclusions that are directly related to the essence of the topic and article as a whole, namely:
- The collected information in any case reserves a certain amount of RAM and hard disk resources, which in certain circumstances may affect the speed of the operating system as a whole.
- Such a "rejection" of processes really speeds up / speeds up the launch of selected programs.

Considering the first conclusion, it is worth noting that some users can really observe in the “Task Manager” that “SuperFetch” carries up to 100% of the load both on the processor, and on the RAM, and on the hard disk. But to a greater degree this is due not to some erroneous work of the service in question, but to the lack of resources of the computer for its full functioning. Taking all this into account, the decision suggests itself, and it consists of two variations:
- “Service deactivation” - if the target computer has component resources that do not have sufficient volume characteristics. For example, if the amount of RAM is 2 GB, but at the same time the super-sampling deducts for itself at least a few percent of the amount of RAM, then when working with resource-intensive tasks, slowdowns in the operation of the operating system are possible.
- “Continuation of operation” - if the background loading of processes does not affect the operation of the computer, and the resources of the components are sufficient for its smooth functioning, then there is simply no need to turn it off.
Disconnect
So, if the first option is the most optimal for you, then the order of shutting down the SuperFetch node service is as follows:
- Press the "WIN + R" key combination and execute the "services.msc" command.

- In the window that opens, sort the list by name.
- Find "SuperFetch" and click on the "Stop" button.
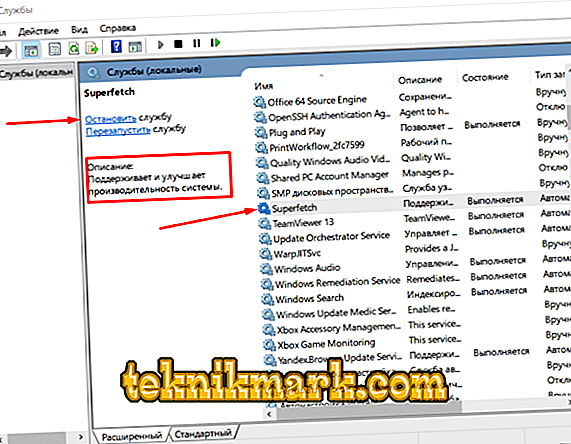
- Right-click on the selected service to open the context menu and open the “Property”.
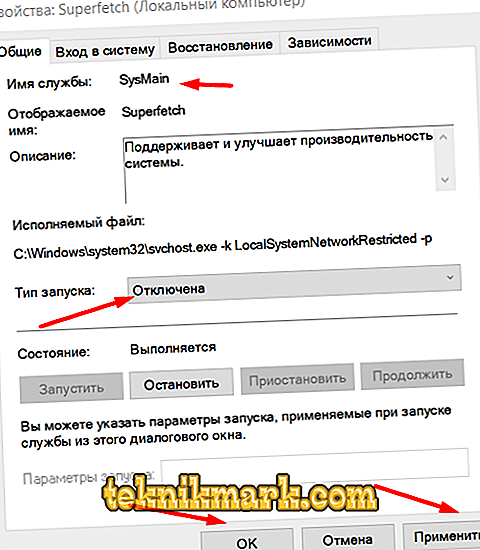
- In the “Startup type” block, select “Disabled”.
- Also for the future it should be remembered that the name of the service in question is in the SysMain system and is directly related to the process “C: \ Windows \ system32 \ svchost.exe”.


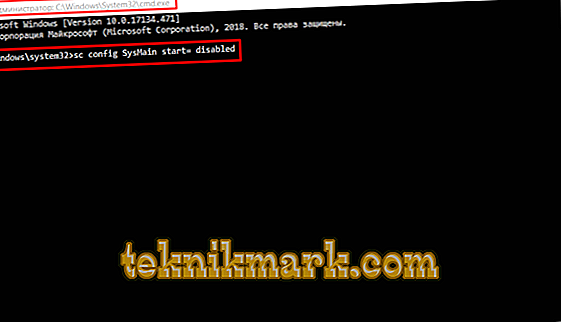
As an alternative, you can use the command line console functionality:
- Open the search using the key combination "WIN + S".
- Enter "cmd.exe" and with a right click of the mouse start it with administrator rights.
- In the opened console enter and execute the “sc config SysMain start = disabled” command.

After shutdown, restart the computer and check whether you have achieved the desired result and whether the launch of the operating system has accelerated.
Functional change
Few people know that the service in question has several directivity options that can be configured to optimize the allocation of computer resources, namely:
- Acceleration of system and program startup (set by default)
- Accelerate system startup only.
- Acceleration only run programs.
At first glance, this may seem unimportant, but if you check the change of directionality in practice, you can be sure that the difference is very significant. To change the acceleration script, use the registry editor:
- Use the "WIN + R" and the command "regedit".
- Follow the path "HKEY_LOCAL_MACHINE \ SYSTEM \ CurrentControlSet \ Control \ SessionManager \ Memory Management \ PrefetchParameters".
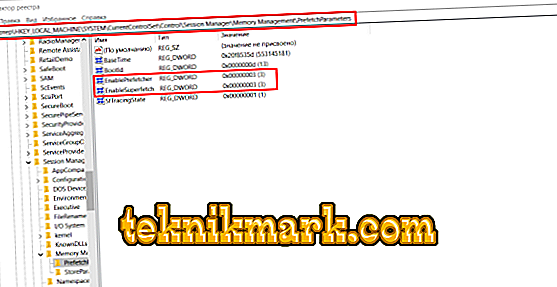
- Open the “EnableSuperfetch” parameter and assign it a value from 0 to 3, where

0 - startup acceleration disabled
1 - acceleration of launching applications only
2 - acceleration of system boot only
3 - speeding up system loading and launching applications
- Open the "EnablePrefetcher" and set the same value.
- If these keys are not present, create them with the “DWORD” parameter and the values announced above.
- Restart the computer and check the effect of the changes made.
Conclusion
In conclusion, it is worth noting again that if the speed of the computer leaves much to be desired, this does not mean that it is time to think about disabling the Windows OC components. Such actions can not be called a guaranteed solution to speed up Windows, they certainly can reduce some of the load, but the changes will be so minor that the difference will simply remain imperceptible.