There are a huge number of different options / ways to create a USB-drive with the boot elements of the operating system for later use as an installation disk or as a recovery medium. This can be realized with the help of a dozen types of software that have different functionality and simplicity of the interface. Among the users, there are two most popular options: the first is the software called “Rufus”, which many people know about, the second is “WinSetupFromUSB” (hereafter WSF). As for the first option, it is the most simple in functional terms, but at the same time it has fewer tools in its structure than option number two. And in order to level these gaps in user interest, this article will discuss in detail how to create bootable and multiboot media using the WinSetupFromUSB program.

Setup and work with the WinSetupFromUSB program.
Where to download and how to run
So, you can download “WinSetupFromUSB” from the official site “//www.winsetupfromusb.com/downloads/”, this can be done absolutely free of charge and without registration. Like many other options, "WSF" does not require installation, which is certainly very convenient, as it allows you to store it in working condition on any media. To run, you only need to unpack the downloaded archive, go to the received directory and start the application depending on the bitness of the operating system used. Immediately it should be noted that there is one single minus that is significant for many users - this is the absence of a Russian-language interface, which in some way may affect the convenience, but does not affect the quality of the software.
How to create bootable media
Before proceeding directly to the procedure in question, it is worth warning that most of the options require full formatting of the used media, and this leads to the loss of all the data stored on them. Accordingly, first you need to save all the important files and transfer them to a hard disk or USB flash drive, where they will be provided with safety. Upon completion of these actions, insert the USB flash drive into the appropriate port and perform the following manipulations:
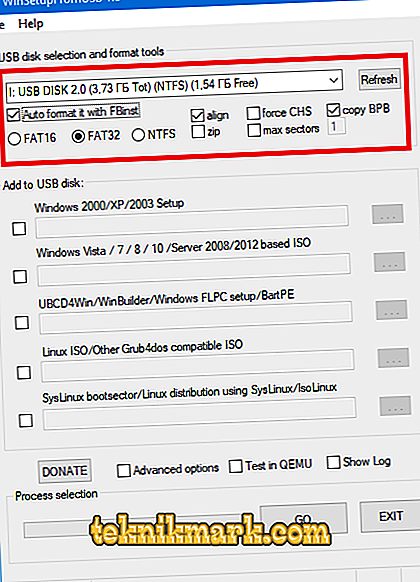
- In the “USB disk selection and format tools” block, select the USB flash drive you need and check the box in the “AutoFormat it with FBinst” box for the subsequent full formatting;
- Next, select one of the 3 proposed formats: "FAT16", "FAT32" and "NTFS". The format chosen depends on where you plan to use the operating system image, for example, “FAT32” should be used for “UEFI + GTP”, and “NTFS” format for “Legacy”;
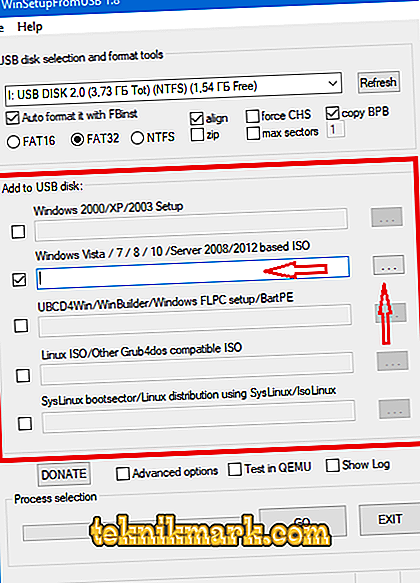
- In the next block “Add to USB disk” you can see that the program implements adding the following images:
- “Windows 2000 / XP / 2003 Setup”;
- Windows Vista / 7/8/10 / Server 2008/2012;
- "UBCD4Win / WinBuilder / Windows FLPC / Bart PE";
- "LinuxISO / Other Grub4dos compatible ISO";
- "SysLinux bootsector".
- Since this article is primarily intended for novice users, it should be noted that attention should not be paid to the last three options. Choose first or second, depending on the version you are using;
- Check the box next to the desired line and click on the "..." button and select the ISO image file or simply write the address of the location in the active line;
- It remains only to press the "GO" button and wait for the program to finish. The waiting time depends on the volume of the mounted image and the speed of the media itself. Even if it may seem to you that the mounting process is frozen, be patient and wait for a regular completion or a specific notification about the program’s incorrect operation.


Multiboot USB Flash Drive
One of the main features of the considered software is the ability to create a multi-boot flash drive, which can contain several different images of the operating system or software distribution kits. At the same time, the mounting process itself is not significantly different from the above, namely:
- If the disk already has some necessary image in the work created in “WinSetupFromUSB”, then at the initial stage do not set a tick in the “AutoFormat it with FBinst” line, but go directly to the selection from step 2;
- You will only have to select and specify the ISO file to use, click "GO" and wait for the end of the procedure;
- If the media is empty, then the tick in the “AutoFormat it with FBinst” line should be left, and also the format should be chosen;
- And in the next step you need to tick two or more points and, by analogy, complete the work.
Conclusion
In conclusion, it is worth noting that with the help of the considered software, you can edit the preferred option of the boot menu, which will provide maximum convenience when using multiple images, and to edit you will need to perform the following steps:
- Open the unpacked folder “WinSetupFromUSB-1-8 \ files \ tools” and run “BOOTICEx64” or “BOOTICEx86”, depending on the required bit depth;
- In the opened window go to the “Utilities” tab;
- In the “Grub4DOS Menu Editor” block, click on the “Start Menu” button;
- Further, the editing procedure goes beyond the “everyday” use and will depend on the individual file structure and the user's needs.
