Sooner or later, any user of a personal computer thinks about the need to improve the operating speed of the operating system, reduce the noise generated by computer components, and also achieve greater cooling of components of the system unit or laptop, which to some extent will lead to an improvement in the computer’s performance as a whole. If for owners of stationary computers everything is quite simple, it is enough to open the lid and tritely clean the components from dust or replace the cooling system if necessary, since this is done once or twice, then for owners of laptops / netbooks everything is somewhat more complicated. Of course, many modern game devices are already equipped with a liquid cooling system, which allows, in principle, not to pay particular attention to such issues.

The method of manufacturing cooling pad for the laptop alone.
For the general segment of portable computers, there are not many ways to achieve greater power from the existing cooling system - this is the same cleaning of the fan blades from dust, its physical replacement, which far from always really improves the temperature indicators. In this case, specialized supports will come to the rescue, representing a metal or plastic substrate, inside of which there is a fan, or in everyday life better known as a cooler that runs on blowing or blowing. Such systems can be freely found in any computer store, as they are in demand regularly and have a reasonable price. But, as mentioned above, the principle of their work is elementary - it is 1 or 2 large “burdock”, powered by a computer using a conventional USB cable. So why not make such a stand yourself, add a unique design to it, and at the same time save some good money? This is what this article will be about.
Why is it profitable
Of course, everyone needs to sensibly assess their capabilities in the selection of components, and in their installation and, in principle, be aware of the feasibility of the intended action. So why is it profitable. For example, in the presence of a laptop "ASUS K95VJ" with a screen diagonal of 18.4 inches. The search for the cooling system in question has established that all the interesting options cost about 2000 rubles and more. Indeed, taking into account modern realities, this amount does not seem significant, but I also didn’t really want to give that kind of money for a beautiful illuminated building, in fact a dummy. And in principle, it is a rather dubious investment of funds, saving which you can, for example, invest in the purchase of components. That is why the author of this article, like many other users, intended to make the cooling pad independently with a minimum investment of money and time spent.
Where to begin
As with any workflow, you should start by drawing up a budget / plan and defining future stages of installation, which will be discussed below.
1 Step. Budgeting and schematic plan
- For a start it is worth answering a few questions:
- “What expectations are placed on the future creation” - for example (for the author of the article here and later), this is a convenient substrate, which is at a slight angle, and 1/2 of the cooler for blowing and blowing. And the goal - to achieve a decrease in temperature indicators at least 5 degrees.
- “What amount can be allocated for this?” - a budget of 500 rubles.
- “What size / dimensions” - since the device has a diagonal of 18.4 inches, then taking into account the location of its legs, the length will be about 36 * 38 cm., Width 35-37 cm.
- "What to make the body / base." Taking into account that “ASUS K95VJ” weighs more than 4 kilograms, the material should be durable, but at the same time it is desirable to achieve small dimensions and lightness. Polypropylene pipes for water with a diameter of 20 mm should cope with these requests fairly calmly.
- “What to make the substrate for fixing the cooler” - the weight of the cooler is minimal, and there will be no load on the substrate, so there is no need for excessive strength from it. Accordingly, the choice fell on the range of stationery, namely, a folder with a metal clip and the most dense / coarse cardboard.
- “What is already available” - there is already an old cooling pad from a device of the same “Asus” brand, but with a screen diagonal of 13 inches, from which you can remove the cooler and the power port.
- “What tools / items will be needed additionally”:
- Ruler, meter or tape measure.
- Office knife or scissors.
- Drill / screwdriver, drill and screwdriver.
- Hacksaw or jigsaw.
- Marker, insulating tape.
- Bolts, nuts, washers.
- Glue gun or double-sided tape.
- Furniture stapler or plain transparent tape.

Step 2. Purchase of materials
Given that the list of items and tools given above does not require additional costs, since all this is available for any average man, it will only be necessary to buy:
- “Polypropylene pipes” - 1.5 / 2 meters of pipe (with a margin), on average, cost about 100 rubles (in the example, 75 rubles * 1.5 m came out).
- "Corners and tees" - four corners at 90 degrees and two tees - a total of 27 rubles.
- "Folder folder" - from what was found in the nearest stores, there was a folder with a rather thick cardboard worth 120 rubles.
Total: 222 rubles.
Installation
Taking into account the above scheme, the direct installation process should also be divided into two parts: the first is the case assembly, the second is the assembly and installation of the substrate with the cooling system.
Housing
It should be noted that further for the frequency of the narration individual indicators will be described, corresponding to the request and the size of the laptop. And it would also be helpful to explain that the author’s possession of tools is at the usual everyday level, so there are rough edges and irregularities in details, and in general the final result does not pretend to any visual and aesthetic laurels.
So let's get started:
- take a polypropylene pipe of the available length and cut off three pieces from it: 1 pc-38 cm., 2 pcs. - 36 cm
- divide the resulting segment into 2 pieces of 10 cm each.
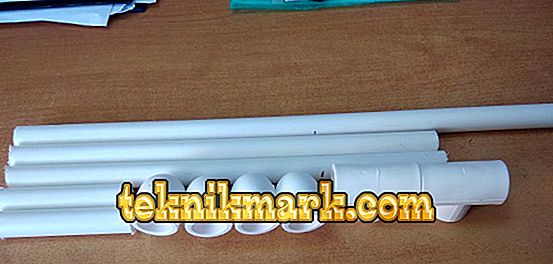
- for strength and tightness of the connection, wrap the ends of the obtained pieces with tape. In the future, if you have a special soldering iron, you can connect all the nodes “tightly”, in the absence of this tool, ordinary glue will be enough.
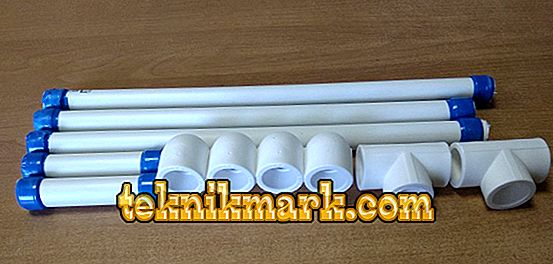
- take the longest piece of 38 cm and insert the ends into the corners.
- Insert the corner to one side in two 10 cm sections.
- Take two segments of 36 cm and insert at the ends of each a tee.
- assemble the general structure:
- Insert the short pieces into the corners of the longest piece so that the corners are facing down.
- Insert the free side of the pipes with a length of 36 cm with a tee at the ends into these corners.
- check the strength of the connection and the correct selection of the length of the pipes.
- On the side tubes, which will take the bulk of the laptop, drill a few holes to fit the size of the bolts.
- flare / expand the holes so that the selected bolts go inside the tube and do not interfere with the installation of the laptop.

- fix the positions of the tubes and set the "designer" aside.


Fan
As mentioned above, a fan with a power button and a port for connecting a USB cable is available from the old device. Separately, a board with a speed controller and several backlighting elements with a total cost of 100 rubles were purchased, which increased the total amount to 322 rubles. The rest of the procedure is as follows:
- take a folder and remove from it a metal clamping unit;
- open the folder and measure the required length in accordance with the length of the stand and taking into account a small stock on each side;
- use a stationery knife to cut off an unnecessary piece;
- since, on the one hand, the substrate turned out to be softer and, after installation, would become very sagging, reinforce the “weak” part with the rest of the folder received above and creak them together with a furniture stapler or just with tape;
- make several holes in the cardboard, taking into account the existing holes in the side pipes of the case;
- take the fan and measure the circumference of its blades with a marker;
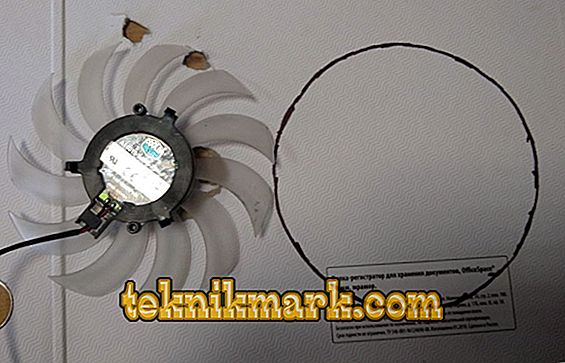
- it is desirable that the blades are located directly under the ventilation holes of the laptop;
- using a clerical knife, cut the marked circle;

- with a drill or sewed on the substrate, make holes for fastening the fan casing.


Here it is worth saying a few words about how the fan should be positioned correctly - on blowing in or blowing out. Opinions in this case diverge, someone believes that if you apply air directly to the laptop case, dust will clog in the air vents, which will increase the frequency of cleaning the computer from dirt, but to a lesser extent will cool it. Partly agree with this statement. Therefore, as mentioned above, the installation of two elements is planned in the stand, one will work to supply air to the body, the other to its output from the body, which will allow for better circulation.
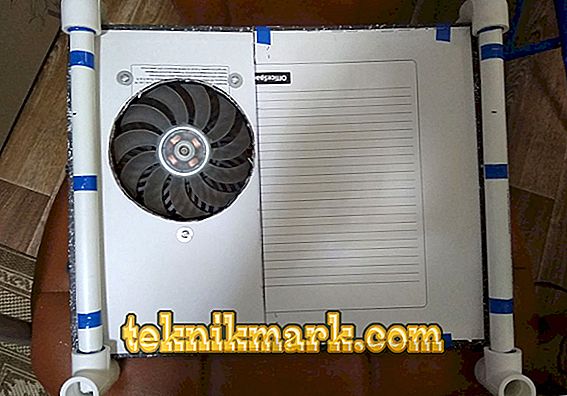
- further secure the fan in accordance with the hole made.
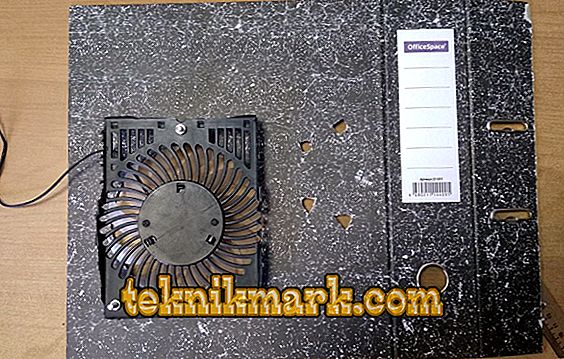

Here it should also be explained why the cooler is installed in this way in the figure. The fact is that there was a fan from the old cooling system, which was attached directly to the plastic substrate, which did not imply its installation in this way. Therefore, it was necessary to cut its holding plastic part and place it so that the blades were below the level of the cardboard. It was easy to achieve this - all you need to do is use three cogs, nine nuts and six washers. That is, the connection has the following scheme - screw-washer-washer-nut-body-nut. This scheme allows you to lower the fan to the desired depth and at the same time to achieve its strong fixation.
- then it will remain to fix the cardboard backing with the cooler on the stand made earlier.

Power and lighting
The final stage consists in the installation of power ports, boards with speed control and, if necessary, lighting elements. Ports and the board were placed on the left side of the stand, and a glue gun was used for fixing. In the absence thereof, double-sided tape can be used. The backlight purchased in the service center for mere pennies along with the board has a small length, so it was placed only on one side of the laptop and fixed with electrical tape.

Alternative
As an alternative, and perhaps even more budget, option, you can select a rather popular scheme, where only the resources of the folder-folder are used as a stand. The installation principle is the same: cut a hole for the cooler, fasten it and make the angle limiters. This option was not considered, since the laptop weighs more than 4 kg. and has significant dimensions, it was likely that such a cooling system simply could not stand it.
Conclusion
In conclusion, it will not be superfluous to repeat once again that the end result is a mixture of ordinary skills in tool ownership and minimal cash outlay. Now directly about the actual benefits of creating an additional cooling system. Testing of temperature indicators was carried out after a 20-minute active web surfing and watching a movie.
Figure 1 provides testing data from the 20th minute of operation.

Figure 2 shows the indicators from 20 to 30/31 minutes of active work. As you can see, the stated result of 5 degrees was achieved without any problems.

Yes, it is impossible to say that these are outstanding results, but taking into account the actual costs and time spent, the independent creation of a cooling pad pays off in full.