Dear readers, today we will try to install Windows Live Movie Maker on a Windows 7 or 10 computer or laptop. Let's say right away that you can easily do this, you do not need to go for someone else's help. Therefore, we tune in a positive way, because you can do everything yourself, even if you have not had to deal with installing any programs or games before. First, let's take a little closer look at the application itself.

Installing a Windows Live program in a Windows environment is easy.
Movie Studio Windows Live is a replacement for the rather well-known Movie Maker (by the way, the name of the movie studio in English is the same), which was produced for an earlier product of Windows XP. We can say that this is a revised version of the video editor. It has a more pleasant user interface, made in the style of the seven and whists, which can not but rejoice the user. The program fits perfectly into the environment of new systems, which is why you will immediately see that this is a product of Microsoft.
In terms of opportunities, it is not only not inferior to Movie Maker, but also far exceeds it. Of course, you can't say that it can completely replace editors for editing and professional utilities. However, you can easily make a beautiful home video or a video about going with friends to beautiful music with interesting transitions.
How to install Windows Live?
- So, first you need to download the installation file of the program on your computer or laptop. You can download the full package from the official Microsoft website. It is worth noting that you will need to connect to the Internet not only at this stage, but also further. The reasons you learn on the third paragraph.
- Next, open the downloaded installation file as an administrator.
- The Windows Live Essentials window opens, which prepares all the parameters for installation and downloads the necessary files. There will be a reminder that preparations are underway for installation. Wait until it is finished.
- Select components to install. If you want to install everything (Messenger, Outlook Connector and others), then click on the first option. Otherwise, click on the second. The next item refers specifically to the last choice. If you put all the components, then go to the sixth paragraph.
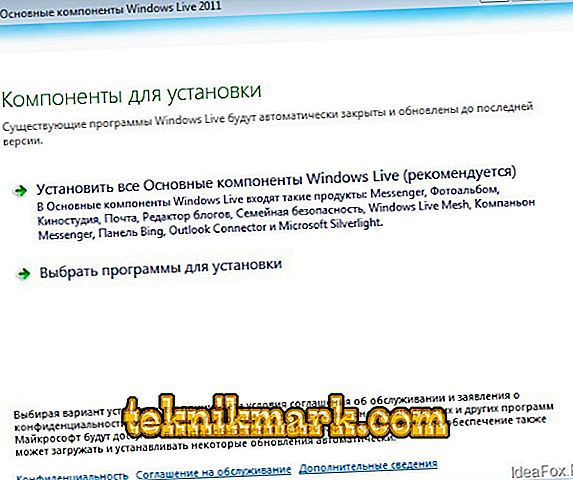
- Please note that you do not need to install all the programs included in the package "Main Components of Windows". You can set a tick just opposite the "Photo Album and Film Studio", removing from Messenger, Writer and Mail. Click on "Install".
- The next window will display the data loading scale. Its speed depends on the speed of the Internet connection. If it is small, the loading time will increase. If you selected all the components at the fourth stage, then you will have to wait a little more than those who put only the album and the studio.
- Congratulations! At the end of the process, you will receive a message stating that the installation of components has completed successfully. You can click the "Close" button.

How to remove Movie Studio?
- Go to the "Control Panel" of your computer using the start menu button. Or use the search for faster access to the required service.
- Open the item "Uninstall a program" at the very bottom.
- In the list that appears, find the application you need, namely, Core Windows Live Components, and click on it with the left mouse button.
- On the top menu bar, click on the "Change / Delete" button.
- The installation program will check with you whether to restore or remove components. According to our discussion, choose the option with the removal.
- Now you have a choice: remove all components or do it selectively. Mark those programs that you want to remove and click "Delete."
- Wait until the end of the process. After successful completion, you can exit the control panel and use the computer as usual. You were able to successfully remove the Movie Studio from your Windows 7 or 10 computer.

Main problems
- Could not establish what to do? Be sure to check the system requirements for the program. If your operating system is lower than Windows Vista, then you will not be able to install this product on your device. Also check your internet connection, because without it you will not be able to install components either. It is required to download files from the company's servers.
- Can't delete what's wrong? Before you proceed to uninstall, be sure to close all programs that are related to the package Windows Live Essentials. Only then you can open the control panel and delete. That is, even if you watch the images through the Photo Album, you will not be able to remove Neither Studio, nor any other component.
- The program hangs on a computer or laptop. It is possible that you have a very weak device characteristics. Then it is not surprising that the video editor hangs. The editing process itself is quite a resource-intensive task, so if you have a simple netbook that can barely cope with surfing the Internet, then it’s no wonder that the studio hangs. Of course, the reasons may be different: from viruses on the computer to equipment failure. But if only this program hangs, then, most likely, the problem lies in the weakness of the device.

Let's sum up
Friends, today we met with the video editor from Microsoft for Windows 7 or 10 under the name "Studio". Now you know that you can easily install it on your computer if you have an internet connection. Deletion occurs through the corresponding block in the control panel menu on the device. We hope that you managed to do everything without any problems. Tell us in the comments if you were able to install this software yourself. Also, do not forget to make your opinion, impression and experience!