Recently, transparent cases for PCs have become incredibly popular. And it is absolutely not necessary to buy an expensive top case - it can be made independently. You need only a little effort, experience and patience.

How to make a transparent case for the computer.
Advantages and disadvantages of a transparent case
The obvious advantage of a transparent case for a computer is its aesthetic component. Among other advantages of the transparent case:
- Multicolored modern LED-lights.
- The ability to control the visual status of PC components, including transistors and thermal grease.
- Unusual design will make the PC the main decoration of your room.
- You can make and upgrade with your own hands!
In most cases, users complain of such shortcomings:
- Too branded.
- Pets regularly leave new scratches.
- Fragile.
- The price is several times higher than the cost of an ordinary case.
- Self-assembly requires skills in handling computer equipment and hardware.
The largest manufacturers of cases have long since brought to the market a line of models of transparent cases for every taste and budget. And the first problem is what material to choose.
Material
If you have already decided to buy a case with a transparent side panel, another dilemma arises - to use tempered glass or acrylic (plexiglass)? Both materials have their advantages and disadvantages, so the choice can be difficult.
Acrylic case
Benefits:
- Less weight.
- Lower cost.
- Easier to disassemble.
Disadvantages:
- More scratches.
- At higher temperatures may be deformed.
Strained glass
Benefits:
- More transparent.
- Easy cleaning.
- Scratch resistant.
Disadvantages:
- Weight.
- Can be smashed.
- Price.

Static electricity
You do not need to buy anything or take additional measures to prevent damage from static electricity when working with PC components. A few simple tips will help to avoid the danger without any extra effort.
- Before starting work, avoid walking in socks on the carpet, as well as remove all woolen things - such materials can accumulate static electricity.
- When working on a computer, leave it connected to a grounded (three-pin) outlet. Be sure to turn off the power completely using the main switch on the power supply (on the back of the case), and not the Power button that you press every day.
- Before touching any internal components, touch the metal part of the PC case with your hand. This will ground you by neutralizing static charge. After that, you can safely get to work without worrying about static electricity.
- Periodically touch the metal parts of the case to neutralize a static charge and remain grounded.
- Never forget about static electricity. Especially if you periodically contact with any individual components. For example, if you need to replace a video card or memory bar, be sure to ground it yourself.
- Professional computer technicians recommend wearing an antistatic bracelet. To use it, simply put the strap around your wrist and fasten it to the PC case. This will ensure constant contact with the case and grounding, allowing you to use both hands inside the computer.
Full protection also provides antistatic mat, but the above tips are more than enough. Even an antistatic wrist strap will be superfluous for a typical average PC user. If you have assembled / disassembled your PC many times and have never encountered static electricity, consider yourself lucky.

Order inside
Make sure you know where the wires should be laid and how to fix the components. Pay special attention to the second - improper use (landing in the socket, temperature, dust) components, whether it be RAM or a video card, will certainly lead to PC failure. The main problem inside create wires connecting the power supply with the rest of the PC. When you make sure that all components that need a separate power supply are connected, pull the remaining wires together with a plastic clip or tape. In most cases, they can be neatly placed along the edge of the motherboard. The case is cooled in such a way that air flows through all its parts, after which a lot of dust accumulates there. It clogs the tracks and air communications of the entire system, which also leads to overheating and breakdown of expensive components. Therefore, it is necessary to perform cleaning regularly, even at home. By sticking to our static electricity tips, remove one side wall and thoroughly vacuum the motherboard.
Be extremely careful not to hook on the processor or RAM!
Cost of
The cost of a transparent case ranges from several tens to several hundred US dollars. If you decide to buy a case with a transparent lid, we recommend Antec's time-tested products. The optimal case for the average user, the Antec Nine Hundred Two V3, has the following characteristics:
- Beautiful outside.
- Lots of ventilation.
- Pretty transparent side window. It also has space for an additional 120mm fan.
- Offers many drive bays (including one 2.5-inch drive bay) and 8 expansion slots.
- The power supply is located at the bottom.
- Huge fan for maximum circulation.
- Speed controllers for each front fan.
- The control unit on the rear panel for the top and rear fans.
- Built-in removable air filters.
As for the shortcomings, users most often complained about:
- Limited small cable holes and rubber gaskets to enhance the appearance of wiring.
- Too many disk compartments - they absorb most of the internal space. Some long video cards do not fit.
You can buy such a case for about $ 140 on Amazon or the manufacturer’s website.

What you should pay attention to when buying
Most technicians pay attention to the following characteristics:
- Connecting the cooler for the processor - allows you to replace the processor or cooler without disassembling the entire motherboard.
- Connection on the front panel - if you have a lot of external devices, check the possibility of quick access on the front panel of the case.
- Fans and airflow - the more fans you have in your computer, the better the airflow will be.
- Dust filters - a computer clogged with dust, pet hair and tobacco debris overheats and fails faster. especially considering the transparent case.
- Soundproofing - special covers ensure quiet operation, often using sound-absorbing materials inside the enclosure panels.
- Water cooling support - thanks to the use of sealed monoblock refrigerators, liquid cooling has become more efficient than ever.
- Tempered glass case - great, but fragile - handle with care!
- Integrated lighting - customizable RGB lights.

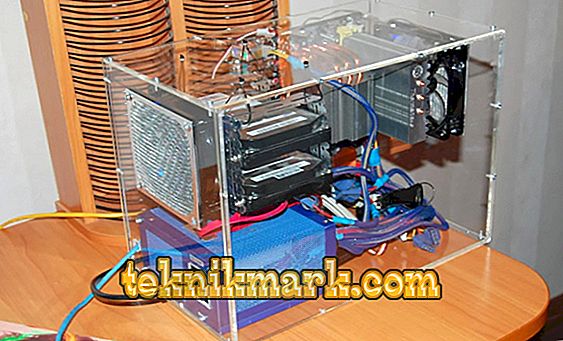
How to make a transparent body with your own hands
The first step in creating a transparent case for the PC with your own hands will be the compilation of a list of necessary materials and equipment:
- 1x1.5 meters of ordinary plexiglass 4 mm ..
- 60x15 cm. Black plexiglass 3 mm.
Computer components:
- Motherboard (Intel H67).
- CPU (Intel G2030).
- CPU cooling fan (Zalman).
- Power supply (Slim Seasonic 250 W).
- HDD 320 GB.
- Fan on the case.
- 2 switches (Power On / Off and Reset).
- LED Strip Light.
Tools and peripherals:
- Bolts and nuts (120 or so).
- Drill drill set.
- Saw, special blade for metal - best suited for cutting plastic.
- Electric drill.
- Wires for LEDs.
- Fan.
- Thermoplastic glue.
- Tin / aluminum and metal shears (for attaching a hard disk).
- Engraver.
- Clamps.
- Aluminum corners.
- Gloves.
- Calipers.

Follow the instructions, and you can easily make a transparent case yourself:
- Cutting Plexiglas - remove the dimensions of all the covers of the old case using calipers and cut them out of Plexiglas.
- Place all equipment on plexiglass - motherboard, fans, hard drive and power supply. Be sure to think in advance, perhaps in the future you will want to connect an additional hard drive or fan.
- Cut a hole for the front fan - use a vernier caliper and an engraver / drill.
- Make a hole for the back of the motherboard and power supply - each motherboard comes with an aluminum bracket. Plexiglas is very easy to break, so be careful, especially when cutting one piece several times (in several places).
- Create a mount for HDD - the hard drive will be located "standing." fix it with tin or thin aluminum. Do not forget the gloves!
- Make the legs for the case so that it stays in place and is stable - rubber gaskets or something similar are suitable for this.
- Fix aluminum corners on the case - make sure that you choose a neutral place where the motherboard or other parts that will be connected later are not affected.
- Create "pads" under the motherboard - a small space (5-8 mm) should remain between the board and the plexiglas. necessary for heat dissipation and safety. Take a new rubber tube, cut it into 8 “rings” of the same size (8 holes in the board) and drill the plexiglass.
- We proceed to the initial assembly. At this stage it is necessary to collect everything, connect and check for operability. After that, you need to disassemble everything and remove it for the protective layer of Plexiglas (nylon).
- Connect the LED strip to the power supply - solder the MOLEX connector to the LED strip.
- Prepare two small switches for on / off and reset. It is not recommended to use cheap Chinese goods - there is a big risk that they will break!
- Connect the switches to the motherboard.
- Insert two LEDs (HDD and power) in the front plexiglass - needed to indicate the status of the system (on / on, etc.). Drill two small holes in Plexiglas, insert the LEDs inwards and fix them with thermoplastic glue.
- Assemble the front USB-connector - drill 2 holes from the bottom of the front panel of the case and fasten the slot with a collar. For accurate hole sizes, use a vernier caliper. transfer them to the front panel and cut.
- Connect all peripherals, start up the PC and install Windows. Install all the latest drivers and the necessary third-party software.
- Disassemble the PC and remove the protective layer of plexiglass. At this stage, the appearance of the new building will be significantly transformed.
- Installing the motherboard - place the rubber gaskets according to the holes and fix the "mother" with bolts.
- Installing a Power Supply — To prevent the power supply from moving, use a pair of small brackets. Before this, make sure that the wires do not interfere with other components.
- Lock the hard drive.
- Pick up a dark fine-mesh fabric and close it all the fans that are displayed outside.

That's all. The build is over! In general, the whole work can take a couple of days, but the result is worth it. The case itself is very quiet (plexiglass is an excellent insulating material), so you can enjoy watching movies, surfing the Internet and listening to music to the full. What material will be best as a side transparent panel of the case of your PC - it's up to you. Different options have their pros and cons. Summarizing, we can conclude that the tempered glass is still a bit more practical. Despite the weight and fragility, it provides a clearer overview of the insides of your PC.