Data encryption is used when it is necessary to block access to information for unknown users. Various programs are used for encryption, but VeraCrypt is the most convenient. This article will provide instructions for installing, configuring and working in this program.

What is VeraCrypt
VeraCrypt is a program designed to encrypt your data. The utility boasts its reliability and unique algorithms that allow decoding only the owner. It must be said that you should never count on 100% information integrity. Beginners are not advised to encrypt the system disk and important data, but if necessary, containers should be used. Our review will cover all these points in detail.
Installing VeraCrypt on a computer or laptop
Installing VeraCrypt is practically the same as installing any other software. We will consider this operation for Windows 7, 8, 10, however, in other operating systems the setting and downloading are absolutely identical.
- Go to the official website of the developers and click Download. After that, open the installed file.
- In the new window you are offered a choice of two items: Install and Extract. In the first situation, the program will be installed on the PC and will be connected to the system (using containers, encrypting system data). When you select the second, an ordinary unpacking will occur, allowing you to use the software as a portable.
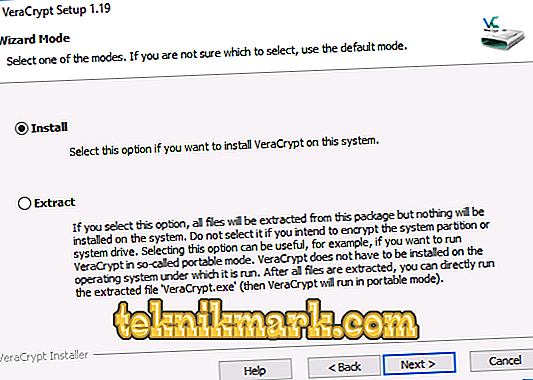
Installation options
- If you select Install, nothing more will be required of you. All parameters will be set by default, but if you need to change something, then do it during the installation.
- Run the application. If you did not immediately turn on the Russian language, then go to “Settings” -> “Language”. Scroll down, set the "Russian". Click "OK".
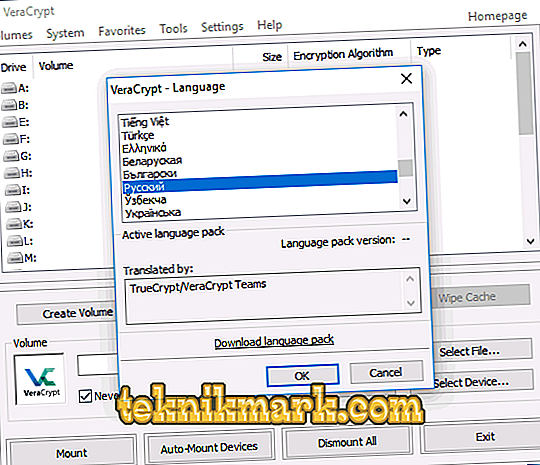
Russian language installation


VeraCrypt Guide
Earlier it was said that in VeraCrypt you can encrypt the system and regular disks and create special file containers. These are files with the .hc format that have the necessary encrypted documents and the ability to be in the system as a separate disk.
Container creation
Let's see how to use these containers:
- Run the application. Click on “Create Volume”.
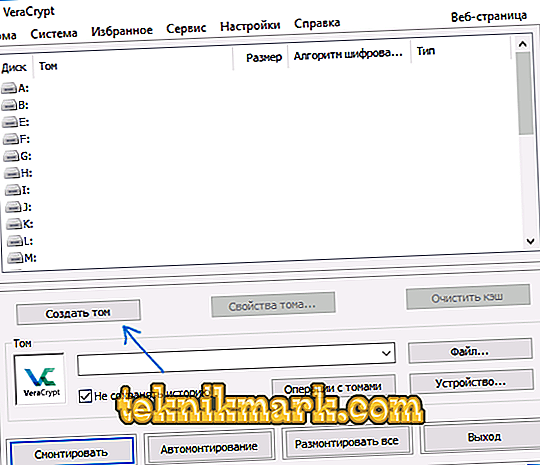
- In the new window, click "Create Container" and click "Next."
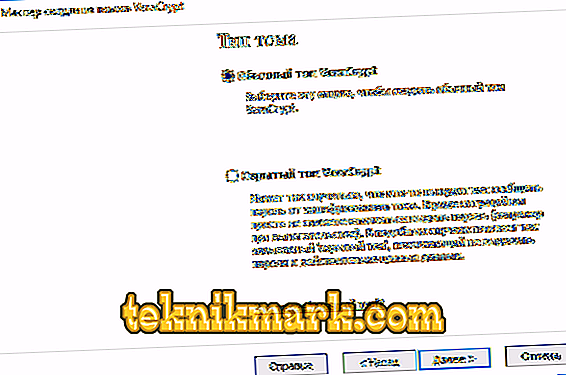
- Set “Volume Type”. A hidden volume is an area in a regular volume; 2 passwords are set - on external and internal volumes. If your password was stolen from an external volume, then the internal data will be protected. Guessing the existence of a hidden volume is also impossible. We will talk about an ordinary volume.

- Now you should specify the location where the container will be stored. You can also specify absolutely any extension, but rather use the hc format.
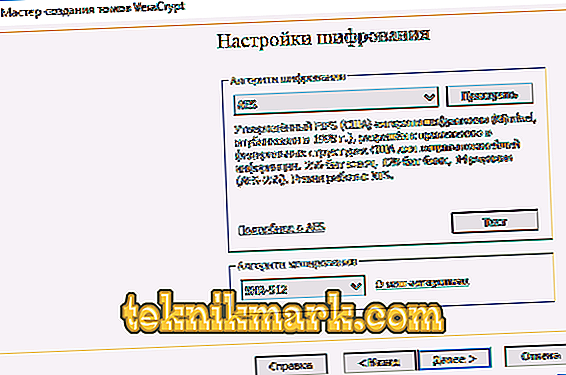
- Set the encryption and hashing algorithm. The encryption algorithm is the main parameter here. It is recommended to use AES, but if necessary, you can use other options. Hash Algorithm select SHA-512.
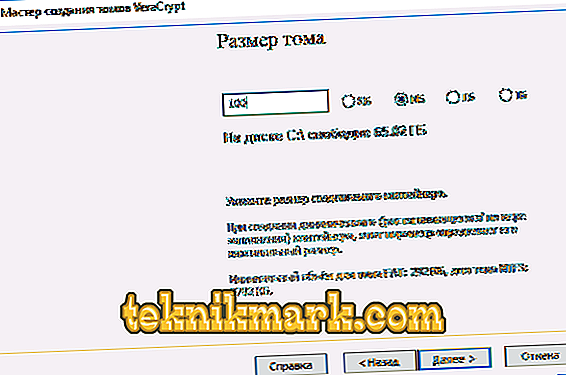
- Specify the size of the future container. It can be specified in kilobytes, megabytes, gigabytes and terabytes.
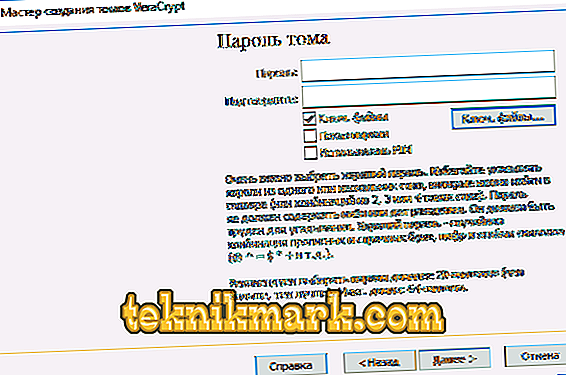
- Go to the serious part - creating a password. Carefully read the recommendations given in this window. When you select "Key. Files "instead of a password, you will need to attach any file. However, it should be remembered that if it is lost, data access will be impossible to obtain.
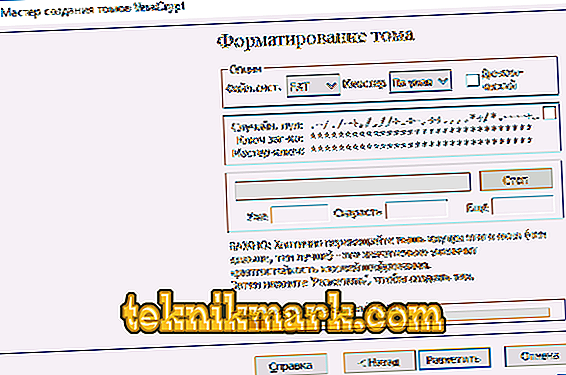
- In the new window, specify the file system of the volume and just move the mouse in the working area until the bottom line is filled. This process significantly increases the cryptographic strength of encryption keys. After that click "Mark".
- The operation is completed. The volume has been successfully created, and you can click on "Exit".


Mount volume
Now you have to mount it for correct use:
- You must first specify the address of the volume using the command line. To do this, click on the "File" button in the right half of the screen and find the newly created container in the explorer. The document path automatically appeared in the corresponding line.
- Then in the list of disks, select the drive letter for the volume. Click "Mount".
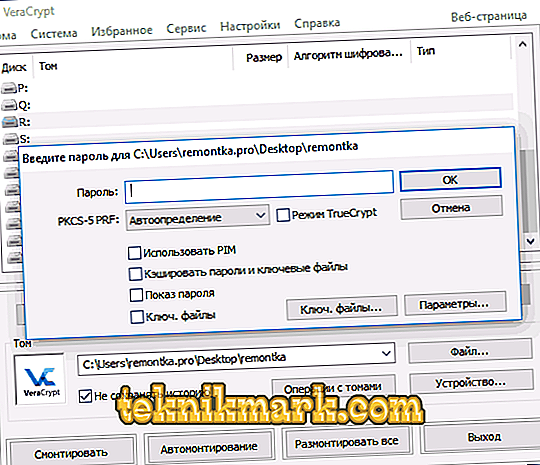
- Specify the password you created or provide the key file.
- Wait a while for the process to complete. After that, the volume will appear in the explorer as a disk.


When you copy files to the created disk, they will be automatically encrypted. To decrypt them, you will need to enter the same password. At the end of the work, select the drive letter and click "Unmount".
Encryption disk (partition disk) or flash drives
If you need to encrypt a disk, flash drive or other storage media that are not system-based, then this should be done in almost the same way as described above. The differences are only a few steps away. In step 2, you must select "Encrypt non-system disk." When you select a device, select “Format disk” or “Encrypt with existing data”. The second process will take more time. If you selected the “Format” option, then at the end you will be asked to indicate whether the new container will use files larger than 4 gigabytes in size.
At the end of the procedure you will be given instructions for further work. Access to the media by the old letter will not be, so you will need to configure the automount. For disks and their partitions, you can simply click Auto-mount, and the system will independently find them. If you work with a flash drive or other device, then do the exact same operations as we did when creating the file container. The difference is that you should click on the “Device” button (for more information, see “Mounting a Volume”). Thus, we answered the question of how to encrypt a flash drive or other storage medium using VeraCrypt.
System Drive Encryption
If you decide to encrypt the system disk, then the password will be required even before the operating system starts. It should be very careful when using this function, because assuming an error is not a fact that you can open the system. The only way out of this situation will be only the reinstallation of the OS.
The whole process is exactly the same as the previous one, however, you should pay attention to some points:
- Before starting the operation, you will be prompted to create a recovery disk. With it, you can recover all your data in case of any malfunctions.
- When you are prompted to choose a cleaning mode, you can safely mark "No" (in the absence of secret information). In this case, the process will take much less time.
- Before the start of encryption, a test will be conducted to ensure that the subsequent actions are correct. When you click on the "Test" button, you will be described in detail what will happen. Carefully read everything written there!
- When you need to decrypt a disk, then in the menu bar, go to “System” - “Permanently decrypt the system partition”.
How to remove VeraCrypt
To remove a program, go to the “Control Panel” - “Programs and Features”. There you need to find the application and delete it.
Let's sum up. VeraCrypt is a serious and powerful data encryption program. However, please note that if you forget the password or lose the file, then you will not be able to regain access. We hope that you have no questions left. If you have them, write them in the comments.