By default, in the AutoCAD program, the shade of the working environment is black or closer to dark gray, but everyone has different perception of colors, for some people the working area for comfortable activity should be white, for someone of darker shades.

In this article, it will be just the answer to the question of how to change the background color in AutoCAD (not to be confused with setting the background image).
How to make a white background
So how do you change the background color to white? Regardless of the version of the program used, the principle of operation is the same and the method is the same for everyone, only the available functionality will differ in the versions 2010/2012/2013/2014 from 2015/2017).
- There are several options for how to get into the settings needed to change the background color:
- the easiest is to enter the "Setup" command;
- click the right mouse button in the command line to open a pop-up menu and select "Parameters" in the list;
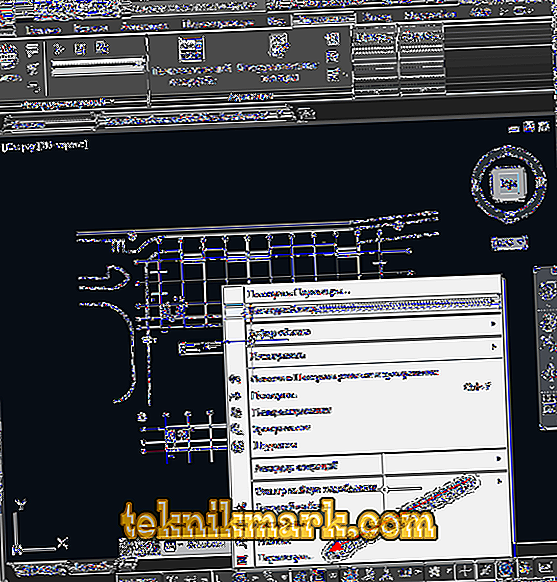
"Parameters" in AutoCAD
- You can use the tab "Service" and at the bottom of the list click "Settings".

- After successfully entering the “Settings” section (Options), go to the second tab called “Display” (Display).
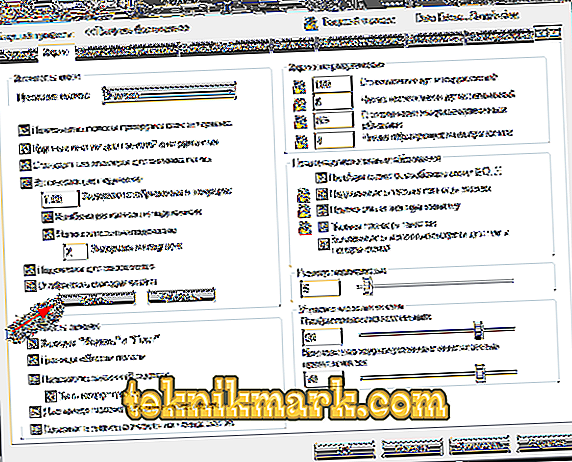
Screen Tab in AutoCAD
- If you also need to change the color of the main console of the interface, then in the row “Color Scheme” (Color Scheme) select “Dark” or “Light”.
- So, to change the background in the auto box, click on the “Colors” button (Colors). The “Drawing windows colors” window will open.
- In this window, in the “Context” column, select “2D model space”, which is the working environment.
- In the "Interface element" (Interface element) in the list select "Uniform" (Uniform backgraund).
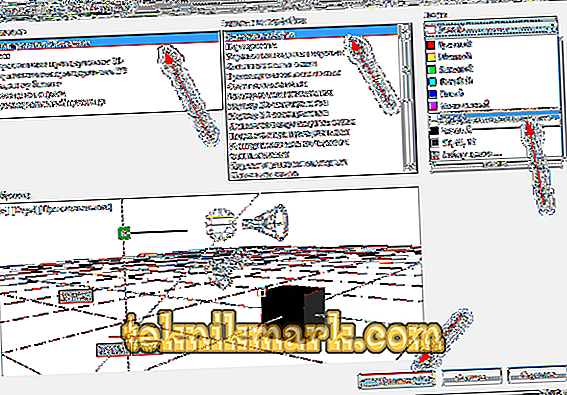
"Space 2D model" in Avtokad
- In the “Tint” column, select the color you need and click “Apply” (Apply & Close) when finished.


Also it is necessary to take into account that the choice of the color spectrum is not limited, and if you click on the button “Select Color”, a window with a palette will open where you can choose any color you like.
That's all that is required, and now you know how to make a white background in an auto-caddy.
How to change the color of the crosshair
It is necessary to take into account such an important attribute as “Crossroads”, and the fact that they can remain the same color as the work area, and during operation it will simply not be visible, for example, a black crosshair on a dark gray background.
To change the color in the "Interface Element" column, select "Crosshairs" and set any shade that will be pleasant for perception on the main work area.

By analogy, you can configure not only the background color in the auto box, but also other elements of the working interface, such as:
- “Main grid lines” (Grid major lines);
- "Intermediate grid lines" (Grid minor lines);
- "Auto Track Vector";
- “Hint under underscore”;
- "Frame control vertices" (Frame control vertices), etc.
The result is the following: all manipulations should be based on one principle: once we change the hue of the background, we have to change it for the entire interface.
You can easily set a bright, rich red background, but at the same time “lose” a couple of key controls.