The age of technology and widespread computerization has long weaned a man away from handwriting and sticking photos into albums. Modern technologies are rapidly developing, constantly replenishing the range and improving the characteristics of electronic devices. Printers are firmly established in the use of computer users and occupy their niche not only in office space, but also in many homes.

Despite the pace of development of production and the emergence of new manufacturers, the famous good old Epson for many years not losing ground in the market for computer peripherals. Consider the independent maintenance of the printer on his example.
As necessary, you need to periodically clean the print head of the device to maintain print quality. This can be done in two ways - software and physical. If your printer began to print badly, horizontal stripes began to appear or the color rendition was distorted, then it is time to clean the printing mechanism of the device.
How to solve the problem programmatically
First you need to use this method, since it is often not necessary to disassemble the device so that print quality will return to normal again.
- Navigate to the Devices and Printers folder.
- Select the name of your device and right click on it, go to its properties.
- On the Service tab, select the head cleaning.
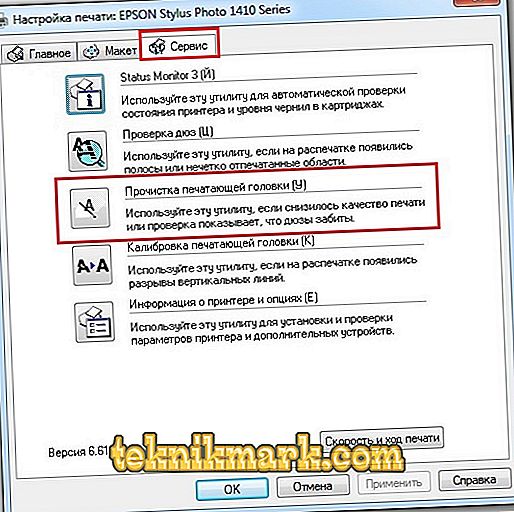
Head cleaning
- When the nozzles of the printer head are cleaned, a test image will be printed, which will make it clear, you need to repeat the same steps again or one procedure was enough.

If the software method for several attempts did not produce results, you made sure that the ink was present in the cartridges and the waste ink drain hose was not damaged in any way (in the case of one), proceed to more serious procedures. Most likely, the printer head is clogged more critically or the air from the ink got into it. Then you have to clean it in a physical way.
Flushing ink channels and printer heads
To work you need to acquire some attributes:
- liquid for flushing the head of inkjet printers (sold in specialized stores);
- 10–20 ml syringe;
- a small flexible tube that can be put on the syringe tip.
- To disassemble the printing mechanism, you must first remove the top cover of the printer. Remove the bolts securing it. A cable connecting the case with the mechanism can be removed from the board to open access to the mechanism.
- Remove the cartridges and place them on the prepared surface in order not to smear everything around with ink.
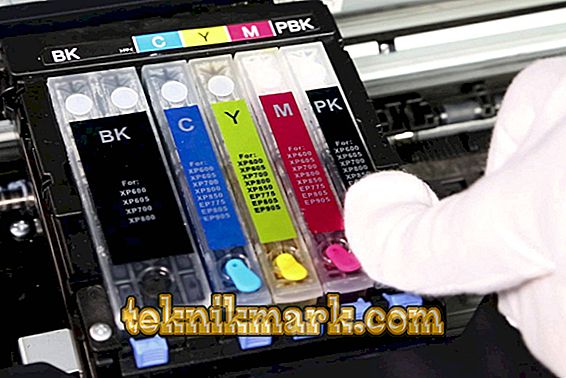
Epson inkjet printer cartridges
- Type the syringe with washing liquid, put the tube on its nose, then the other end on one of the ink inlets located at the location of the cartridge, slowly press in the liquid, preventing it from spilling. To rinse one color, 1 ml of liquid is enough.
- After a few minutes, start slowly drawing the fluid back into the syringe, it will turn the color of the ink. In the same way you need to rinse the other colors. It is better to make several such manipulations on each choke.
- Replace cartridges.
- Move the carriage to the side, blot the bottom of the print head with a cloth moistened with liquid, and replace the carriage.
- Use a tissue or cloth to remove any excess liquid from the printer's case.
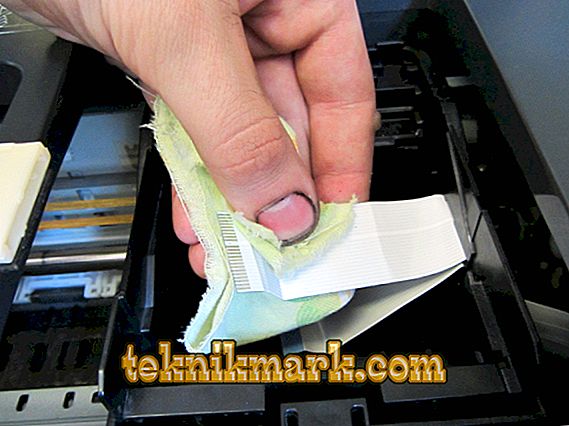
Removing fluid from printer housing
- After all procedures, clean up again programmatically.


Removing the printhead and soaking.
For more severe cases, it is necessary to soak the mechanism from several hours to several days. Before removing the Epson printhead for further procedures, you must turn off the device.
- When turning off the printer, the carriage should remain in the middle, in the position of replacing the cartridges, making them easy to remove.
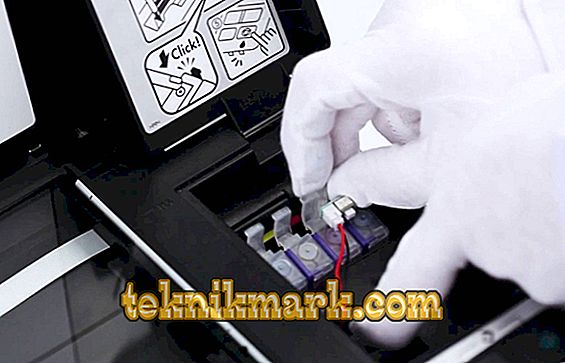
Removing cartridges from the carriage
- After removing the cartridges, remove the protective covers and disconnect the pad of the contact pad, remove it.
- Gently press the latches that secure the mechanism, remove the print head.
- Put the capsules with the washing liquid on the nozzle and place the mechanism in a shallow container, at the bottom of which several millimeters of liquid should be poured. Make sure that the liquid does not fall on the board located on the back side, otherwise the mechanism will fail when the device is turned on. If, however, it was not possible to avoid the ingress of liquid, gently blot the board with a napkin and let it dry well.
- After the soaking procedure, test the nozzles using the Service menu, as described above.

Inkjet printers do not like to idle without work, so periodically you need to bring them into action, printing at least a couple of pages a week. Otherwise, the print head may simply dry out, and it may not always be possible to reanimate.