DualShock joysticks, of course, break, and they get dirty like, outside and inside, it shouldn't be a secret for anyone. Moreover, we all expect that sooner or later this device will have to be repaired. And the reason, in fact, is one and understandable - either you play and it breaks, or you do not play and you like new, but then why buy it!

In addition, the joystick is "on the most advanced gaming front." He does not always withstand our passion or impatience. What can I say, to drop the joystick from the dinner table is a common thing. If he were on the wire, it would save. But there is no wire and our joystick flies right up to the very finish line - and it’s good if the landing is soft.
Of course, cleaning and repair, and quite cheaply, you will readily perform in any specialized service center. But why spend time and money on it, it's simple and you can handle it yourself.
We prepare ourselves, we prepare the workplace, we prepare the tool.
Yes, this is a simple matter, but it requires respect for oneself, and above all, calm but thoughtful preparation:
- Prepare a comfortable workplace - the best is a clean table so that nothing interferes.
- Prepare several cross-head screwdrivers, well, or nozzles - in fact, one is enough, but, as usual, you never know which one will be most convenient, so just in case there are several.
- For cleaning, it is a very mild soap solution, if alcohol is not higher than 70%, it will need to be used very carefully, literally “on the corner of a rag”.
- And also for cleaning - a clean cloth, but not giving a nap.
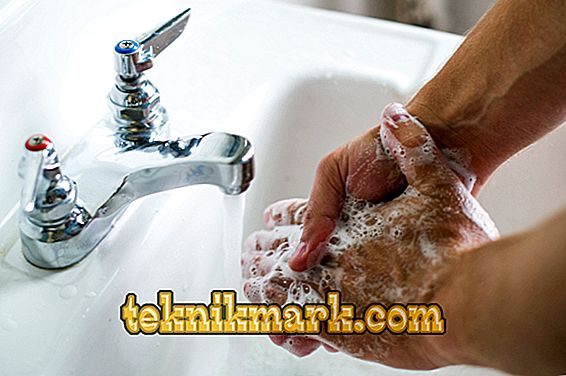
We also cook ourselves - we wash our hands thoroughly, no fat heels are out of the question.

Important warning: is it worth starting at all?
Before you begin, you need to be very aware of what it all means: cleaning the PS3 joystick — is it really possible to find out what is inside from a purely “sporting” interest.
Here if you have:
- PS3 gamepad does not work at all, then it is simply useless to get inside, you will not have original spare parts, and you will only put yourself on your own. Repairing a PS3 joystick with your own hands is almost hopeless.
- The buttons are jammed, the autopsy will help only by showing this very visit-effect, which is called “blew-spat”, just opened it and collected it again, and it all worked.
- It is necessary to put a new battery, this one is completely pulled out, does not pull, and that's it.
It is necessary to rub out the garbage and wipe everything inside slightly. Well, if you play a lot and for a long time

In all other cases: in case of malfunctions with the boards, with failed engines, with broken gum keys - it is useless to repair it yourself, you need to carry it to the service center, where there are spare parts. Or frankly, prepare 3-4 thousand for the purchase of a new DualShock 3 (although the price actually floats from 2.5 to 7 thousand).
So, it is decided - and proceed
If you do decide to at least clean inside, then, armed with care, accuracy and calmness, proceed and disassemble:
- Turn the joystick down with the keyboard, pick up the screwdriver and unscrew all the screws, there are four of them. The screwdriver needs to be selected not only by the size of the screws, but also by the diameter of the screwdriver rod itself, if it is too wide, you may not you need to push the screwdriver down with force, you damage the course to the screws.
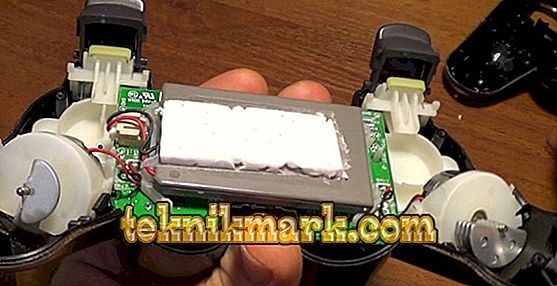
- When the screws are all loosened, gently loosen the case and remove it, we have before our eyes the battery in the fixing frame.
- We take out the battery connector and remove the frame, unscrew the two screws securing the frame brackets from the board.
- In the process of disassembly, we carefully note the location of all the details; in no case can one forget “where and what was before”, although there will be few details.
- Next, unscrew the screw that secures the electronic board, and two screws holding the engines on the right and left.
- Gently pulling the connector, remove the design - the board plus two engines.
- We got to the keyboard.
- Now you can check the status of the gum keys, wipe them and all the internal space, if necessary, replace.
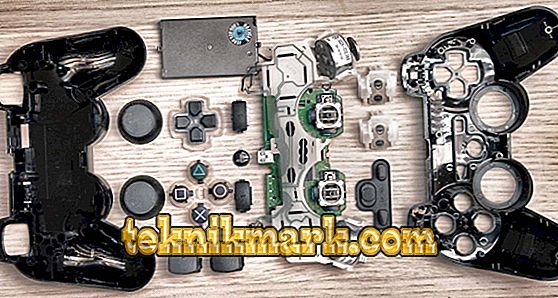
Fully disassembled joystick
- To wipe, use only a mild soap solution or a very mild alcohol solution. If you use alcohol above 70%, then there is a greater likelihood of damage to the surface and rubber bands.
- When the cleaning is finished, proceed to the assembly in the reverse order.
- Pay attention to the even position of the gum and reliable fixation of connectors.
- Carefully tighten the screws holding the engines.
- Do not rush when everything is assembled and you just have to fasten the lid - it needs to be taken slowly, but precisely leveled. Without skill, many people fail to do it the first time. If the cover does not sit down, then most likely the train is unevenly laid down.

After assembly, you can proceed to cleaning the gamepad and the outside. Use for this purpose only a rag slightly moistened with soapy water, and no leaks, only slightly moistened, but the movements are sure, giving no dirt the slightest chance.