The solution to the question of what to do if the PS2 does not read the discs can be divided into two parts:
- First check the discs themselves - these are the favorite actions offered by Sony itself.
- The second is to test the Playstation mechanisms themselves, this is for those who are not afraid to take risks and can hold a screwdriver in their hands, although science, frankly, is elementary.

Offers from the manufacturer
These proposals, in principle, are true: what to fire from the guns on the sparrows, what to climb into the mechanics, if everything is much simpler, you just use bad disks.
In this way:
- We check the condition of the disc itself - it should be free of greasy stains and no visible scratches. If there are scratches, then check the disk just in case on another console, but, in general, it is better to discard it immediately. If there are no scratches, we wipe the entire surface of the disc with special wipes for CD / DVD and try to read the disc again.
- If the disc is unreadable, try to replace it with another (third, fourth), guaranteed to be tested on another Sony PlayStation console. If everything is all right with those, it means you need to “throw away” the disk, the problem is in it.
You can try to read the disk on another console, if there is any discrepancy, then the fate of the disk is predetermined - as Billy said in “Treasure Island”, it will end badly. If the disk on the other console is read, then there is a reason to make plans to repair your PS2.
- Do not forget to follow the releases produced by the manufacturer. In one of them, Sony did not directly recommend the use of PB-disks, they "sow" the prefix laser, which is why over time the PS2 stopped reading disks. Here I must say that the laser itself, according to the technology, sits down. The thing is that the game PB make this process much faster. For the sake of fairness, I must say that we also need to choose the manufacturers of the discs themselves; you shouldn’t buy left discs with games, it’s not known where they are copied and it’s not known on which discs. Some use PB-drives for more than one month, and everything is in order.
- Try to check whether your prefix reads disks of a different format - perhaps the problem is global and is related to the console itself, it does not want to perceive the disks of just one particular format. There is no solution to this problem - consider that this is a feature of your console “in life”, as they say. You simply will not use games on discs of this format.
- If the problem is really related to the PB-disk, try to record the game on another one the same, perhaps incorrectly or with errors was recorded.

If all these disk manipulations did not work, then, according to Sony, there is nothing to do, you need to carry the product to a service center. Perhaps this is correct. In any case, keep in mind that Sony does not officially supply spare parts for its consoles and all you find on the market is “Chinese” or taken from other consoles.
We are trying to determine the cause by ourselves.
The reason for the lack of response of the console, after the disk was installed in the drive, may be that it simply does not spin. To clarify this situation:
- We carry out a visual inspection of the drive console - and there can be no question of any foreign objects, dust or hair.
Inspect the train - no fractures and cracks, although, given its flexibility, it is not clear how they can appear
- Check the condition of the contacts preventing the drive from switching on with the cover removed. The contacts may be broken and do not perceive the top cover, for them it is always removed.
- Contact verification can be done without installing a disk. Just click on the pins and apply power. The engine should work, and the laser will advance.
- With the engine turned off, check the smooth progress of the laser assembly along the guide metal rod. If the stroke is difficult, the surface of the rod must be lubricated.
- We also check the fuses, through which the laser is supplied with power to 8.5 V. It is best to simply replace them with guaranteed ones.
- The decision to replace the laser is made, if the voltage is on it, the head goes to the center, but the lens does not glow.
- The decision to replace the chip (and this is its acquisition and work on chipsetting) is made then, if the disks spin up, the laser is in order, but no information is transferred.
- We carefully control the speed of the disk rotation, and it is precisely by this that the system determines the type of the installed disk - CD or DVD. But if the speed is such that the definition is impossible, then the rotation simply stops. This situation requires replacing the engine.
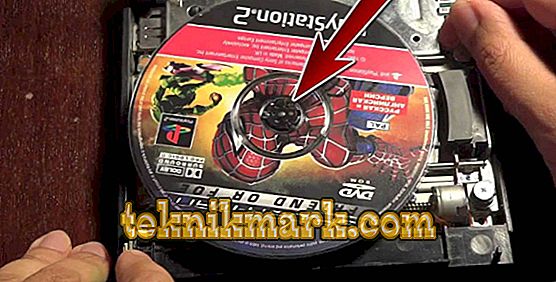
- We check the quality of the engine by hand - the rotation should be smooth, effortless, with a well-held disc in its place, its plastic clips should not be broken.
We control the nature of the disk rotation not only horizontally, but also vertically - due to displacements in the disk rotation, the quality of information reading by the laser greatly decreases, it too often and inaccurately begins to change the focus of the lens


Take your time, however, with far-reaching conclusions about the replacement of the engine and laser, perhaps you have replaced the chip on the console and you just need to restart it. But really often the cardinal solution to the problem is to replace the engine and laser.
The first decisive action - change the engine
If the decision is made to replace the engine and there is a “Chinese” new applicant, then we do this:
- Unscrew the 6 screws securing the back cover. Five of them are under the legs, and one is under the identification label.
- We remove the cover - very carefully, it is still supported on the latches on both sides, on the side of the connectors and on the right (the connectors on my own). Here it will be important to take the time to feel the nature of fixing the cover.
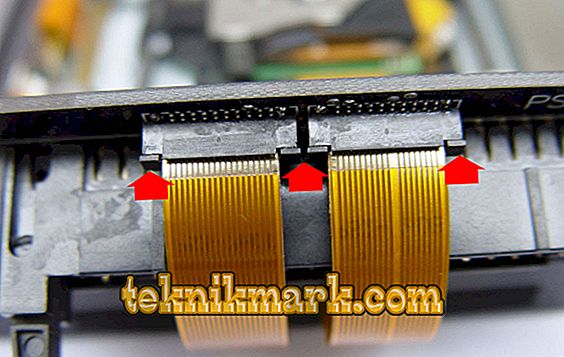
- We check the rotation of the disk, holding the sensor contacts - they are located diagonally along the edges of the structure.
- Take out the engine plume.
- We unscrew the three screws of its fastening (we draw your attention, the fourth “not about us”, it fixes the control board and the engine).
- Install the new engine in place. Twist the screws.
- Very carefully insert the train. You may have to “suffer” with the length of the cable, which means you need to lightly assemble it into an accordion and fix it (with the scotch tape best).
- We put the cover back in place - very carefully again with the latches and connectors.
- Twist the 6 screws.
- Engine replaced.
The second decisive action - we change the laser
Changing the laser is to perform the following operations:
- Again, remove the cover.
- Turn off the screw fixing worm gears.
- Unscrew the two screws fixing the design of the laser guide rod.
- Remove the guide rod, lubricate it if necessary.
- Disconnect the cable from the laser head.
- We set in place a new laser.
- We assemble the design to the cover, in the reverse order.
- And now it is very important, what many people forget. To make it work, you need to unsolder the jumpers that protect the laser from static electricity while working with it during installation (“protection from stray hands”). The jumpers are easily accessible, but they are in an inconspicuous place - on the side, on the side of the main control board of the product, closer to the train.
- When the jumpers are soldered, you can complete the assembly and start checking the replacement.
All these operations are not so important as they are useful, so as not to forget where your home is a screwdriver and a soldering iron. But we always mean that with a lack of time and skills, it is always better to contact service centers with such repairs. Unless, of course, you see your PlayStation 2 as a testing ground for testing your electronics repairman skills.